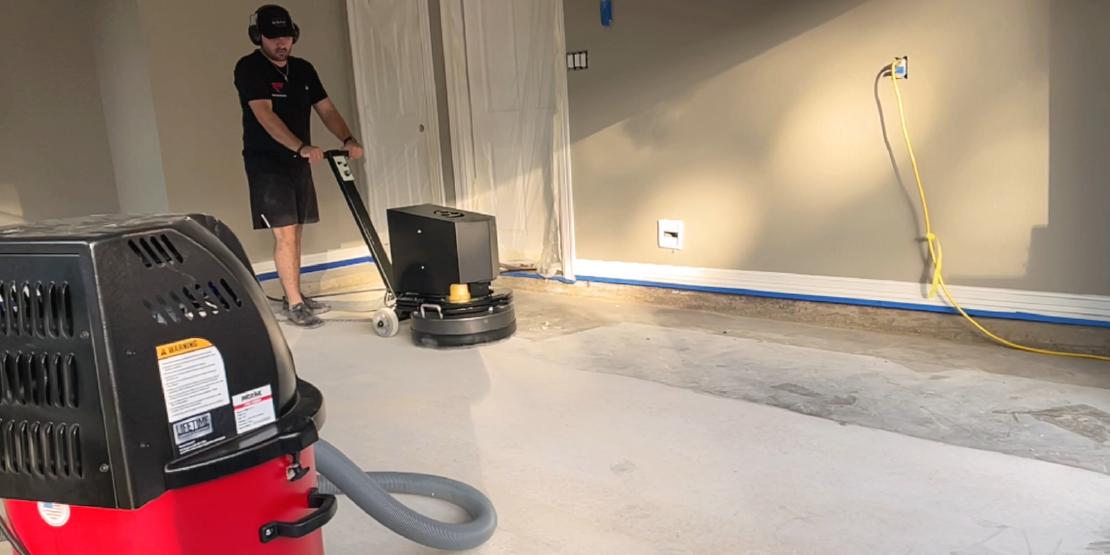

The Process of Preparing Your Garage Floor for Coating
Understanding Why Your Garage Floor Needs a Coating
The garage floor is one part of the house that is typically overlooked, despite its importance and consistent use. The surface is constantly subjected to heavy loads, high foot traffic, oil spills, chemical exposure, and other harsh elements that can cause it to deteriorate over time. Unfinished concrete floors can absorb stains, start developing cracks, become hard to clean and eventually, lose their appeal. This doesn’t just affect the aesthetic quality of the garage, but can also lead to more serious issues if left untreated.
Applying a coating to the garage floor offers many benefits. Not only does it provide a protective layer that enhances durability, but it also creates a barrier against moisture, chemicals and abrasions. The coating also makes cleaning and maintenance easier and extends the lifespan of the floor. Moreover, it offers the advantage of adding aesthetic value to the space by providing a polished, professional finish that can dramatically transform the appearance of the garage.
Assessing Your Garage Floor Condition
The first step in transforming your garage floor is to conduct a detailed assessment of its current condition. Signs of severe wear and tear such as deep cracks, pitting, or moisture damage can indicate the need for a more aggressive repair approach before any coating is applied. However, even minor issues like oil stains, slight surface cracks, or minor pitting should be addressed to ensure the coating adheres properly and lasts over time.
After identifying the physical state of your floor, consider its usage. High-traffic garages may require heavy-duty coatings to resist wear, while a rarely-used garage might only need a light-duty coating. Assessing the floor’s condition accurately will prevent future problems down the line and can ensure the longevity of the new coating. This step helps homeowners select the most appropriate coating product and method for their specific needs and circumstances.
The Importance of Thorough Garage Floor Cleaning
A meticulous cleaning of your garage floor plays a pivotal role in the longevity and continual effectiveness of any applied coating. This cleanliness ensures that there is no dust, dirt, or oil that might become a barrier to the adherence of the coating. Grime and grease act as formidable adversaries to coatings, preventing them from achieving the strong bond necessary for a durable and long lasting finish. Moreover, a clean surface also augments the overall look, giving the coating a smooth and glossy finish.
Cleaning your garage floor is no casual task; it involves several steps intertwined with careful analysis of the floor condition. First, you need to sweep off the dust and loose particles. The next step is a more detailed scrubbing using suitable cleaning products, primarily intended to remove oil patches and stubborn stains. It’s vital to rinse thoroughly post scrubbing to ensure no residues are left. Hence, a comprehensive cleaning prepares your garage floor for the subsequent stages of coating. • Evaluate the Floor Condition: Before you begin, it’s important to assess the condition of your garage floor. Look for cracks, chips or other signs of damage that may need repair before cleaning and coating can take place.
• Sweep Off Dust: The first step in the cleaning process is sweeping away all dust and loose particles from your garage floor. This will ensure a more effective scrubbing process later on.
• Choose Suitable Cleaning Products: Not all cleaners are created equal when it comes to removing oil patches and stubborn stains from your garage floor. It’s crucial to choose products specifically designed for this purpose.
• Detailed Scrubbing: After sweeping, it’s time for a thorough scrubbing of your garage floor using the chosen cleaning product(s). Be sure to pay special attention to areas with heavy staining or oil residue.
• Rinse Thoroughly: Once you’ve finished scrubbing, rinse the entire area thoroughly with water. This will help remove any remaining cleaner or grime left on the surface after scrubbing.
• Dry Completely: Allow ample time for your garage floor to dry completely before moving onto subsequent stages like applying coatings. Any moisture left behind could interfere with these processes and affect their effectiveness.
In conclusion, thorough cleaning of your garage floor not only helps prolong its lifespan but also enhances its appearance by providing a smooth and glossy finish ready for coating application.
Choosing the Right Cleaning Products for Your Garage Floor
When preparing for a garage floor coating process, the choice of cleaning products can significantly impact the final results. Different floors may require different cleaning agents depending on the level and type of dirt or stains present. For regular dust and debris, a simple sweeping followed by a mild detergent can suffice. However, stubborn stains like oil and grease demand a more robust cleaning solution, such as a degreaser.
Degreasers work effectively by breaking down the grease or oil particles, making them easier to wash off. A strong acid-based cleaner can also be used for removing rust stains. It’s worth mentioning that these cleaners should be used with caution due to their harsh nature; protective gloves and safety goggles should always be worn during the cleaning process. A pH-neutral cleaner is another great choice, especially if you’re working with a concrete garage floor, as it won’t damage the surface. Additionally, for a comprehensive clean, consider investing in a pressure washer for a thorough deep clean before starting the coating process.
How to Properly Clean Your Garage Floor
Cleaning your garage floor properly requires diligence and the use of appropriate supplies. Initial steps involve removing any loose dirt or debris. This can be done effectively with a high-quality broom that can reach into corners and along edges. An industrial vacuum is an excellent choice for fine dust or smaller particle removal. Ensure your floor is immaculate to achieve superior results, particularly prior to the application of a coating.
The second stage involves dealing with stains, usually resulting from spills such as oil, gasoline or other chemicals commonly found in garages. A good degreaser can accomplish this task efficiently. Carefully apply the degreaser on the stained area and let it sit for a while, as indicated by the manufacturer. Then, with a stiff-bristled brush, scrub vigorously until the stain lifts. Rinse the area with water before moving onto the next stain. This two-step cleaning process, when done correctly, leaves your garage floor clean and ready for further treatment.
Identifying and Repairing Garage Floor Cracks
Despite the longevity and resilience of concrete, garage floors are not exempt from the wear and tear. Over time, stress, exposure to moisture, and temperature changes can lead to visible cracks on the floor surface. Recognizing these cracks early on is crucial as they can create safety hazards and compromise the integrity of the space. While hairline cracks can be readily spotted due to their linear pattern, wider cracks might hide under accumulated dirt and need a closer inspection.
Crack repair is an essential stage in maintaining a garage floor before a epoxy coating application. Thus, before you think about coating your garage floor, ensure all the cracks are addressed. Smaller cracks can be filled in using a suitable, high-quality concrete repair product. This product needs to be pressed into the crevice thoroughly to guarantee a complete fill. Larger cracks, on the other hand, may require professional intervention as they could be an indication of a more significant structural issue. These tasks can help ensure that your garage floor remains safe and extends it’s lifespan.
Selecting the Best Coating Product for Your Garage Floor
Choosing the ideal coating product for your garage floor is a crucial step in achieving excellent results. There are various types of coating options available on the market each with its unique properties and applications. The most common of these are epoxy, polyaspartic and acrylic seals. Epoxy coatings are renowned for their exceptional durability and chemical resistance, making them suitable for garages that encounter intense use.
On another note, polyaspartic coatings are known for their extreme resistance to ultraviolet light and quick curing times which reduces the waiting period for the coating to dry completely. They’re the perfect pick for projects that require speed and efficiency. Then, there are the acrylic seals that, while not as durable as their counterparts, are easier to apply making them ideal for DIY projects. Each coating has its pros and cons, and understanding these will help you make an informed decision that best suits your needs.
Applying Primer to the Garage Floor
Priming the garage floor is a vital process that ensures the best adhesion of the coating product to the floor. Choosing a high-quality primer is as essential as selecting the premium coating. Not just that, it’s necessary to apply the primer evenly over the entire floor surface. This process provides a uniform base that enhances the effectiveness of the applied coating. It also helps in highlighting any last-minute repairs required on the floor surface, like smoothing out minor blemishes before the final coating.
When applying the primer to the garage floor, first, clean the applicator to remove any dust particles or residue. Then, dip the applicator in the primer solution and spread it evenly on the floor, ensuring no area is left untreated. One should remember, the thicker the primer application, the longer it takes to dry. Also, always start from the furthest corner and move towards the exit to avoid stepping on the freshly primed floor. Lastly, remember to give it ample time to dry completely before layering the coating product.
How to Effectively Apply the Coating on Your Garage Floor
Applying a coating to your garage floor starts with ensuring an evenly spread mixture. Utilize the specified roller in your kit or an extended paint roller for reaching farther distances and corners. Ensure the mixture isn’t spread too thin, but maintain a balanced cover, in fear of dripping or uneven coating.
Work with precision and patience. Work from one corner and logically progress across the floor, ensuring the section where you’re standing is your last stop. While applying, cross-roll, first in one direction and then perpendicular to the first. This technique promotes an even layer and aids in achieving a professional-looking finish.
Managing the Drying and Curing Time of Floor Coating
Once you’ve successfully applied your preferred garage floor coating, properly managing the drying and curing time is of utmost importance. This phase often involves patience and meticulous attention to ensure the longevity and durability of the coating. Depending on the product you’ve chosen, drying times can greatly vary, as some may require only a matter of hours while others might take a few days. Typically, manufacturers provide specific drying time guidelines on their products, which you should strictly adhere to for optimal results.
A common mistake made during this process is rushing the drying and curing time, possibly leading to issues such as weakened coating durability, prolonged curing times, or poor adhesion. Besides, environmental conditions like temperature, humidity, and airflow can significantly influence the drying and curing process. For instance, applying the coating in cold, humid conditions could delay the drying time, while excessively warm and dry conditions might cause the coating to dry too quickly, thereby degrading its effectiveness. Therefore, ensuring appropriate environmental conditions and patiently allowing the coating to fully dry and cure is crucial to maintaining a well protected and visually appealing garage floor.
Safety Measures to Consider While Applying Garage Floor Coating
It is imperative to put in place robust measures that guarantee safety when applying garage floor coating. First, always ensure that the area is well-ventilated since the coating process often involves the use of products that emit strong fumes that can be harmful when inhaled excessively. Remember to wear a respirator during the procedure to safeguard your respiratory system. In addition, it is recommended to use safety goggles to protect your eyes from any splashes.
In the same vein, rubber gloves should be worn to protect your hands from direct contact with the coating, especially if you have sensitive skin. It is also advisable to wear old clothes or overalls to dodge any potential damage to your clothing from the coating. A key precaution is to keep small children and pets away from the garage area during preparation and painting. This not only protects them from harmful toxins but also prevents accidental disturbances on the newly coated floor.
Maintaining Your Newly Coated Garage Floor
After applying the right coating to your garage floor, taking the time to maintain it will ensure it remains durable and visually appealing for years to come. Regularly sweeping or using a blower to remove dust and debris can protect the coating from abrasion and scratching. It is recommended to perform this simple task at least once a week or more frequently depending on the usage of the garage. Cleaning with a mild detergent when necessary will help tackle stubborn spots and stains without damaging the coating.
When it comes to protecting your garage floor coating from heavier damage, consider using rubber mats or rugs in high traffic areas or places where heavy machinery or equipment is often used. Restrict the use of harsh chemical solvents for cleaning, as they can strip the coating over time. Regular inspection can also help you spot early signs of wear and tear. Prompt repair of any damage, no matter how minor, will prevent it from deepening and considerably extend the life of your coated garage floor.
Troubleshooting Common Problems After Garage Floor Coating Application
Despite meticulous application, you may encounter a few issues post garage floor coating. Some common occurrences include peeling, bubbling, or debonding of the coating.
Peeling or flaking most often occurs due to poor surface preparation. If not thoroughly cleaned and allowed to dry, residual moisture or dust can prevent the coating from adhering properly to the floor surface. To rectify this, you’ll need to strip back the offending sections, re-clean, and then reapply the coating. Bubbling, on the other hand, usually happens if the floor wasn’t properly ventilated during application and the curing process. To mitigate this, ensure good air flow and avoid applying the coating in extremely hot or cold temperatures. Debonding can happen if a primer isn’t used before the main coating. Despite seeming like an extra step, a primer will help the coating bond strongly and is crucial for a long-lasting finish.
Why does my garage floor need a coating?
Garage floors are exposed to various elements such as oil, grease, and chemicals that can damage the floor. Applying a coating to your garage floor can protect it from these elements, improve its appearance, and increase its lifespan.
How do I assess the condition of my garage floor?
You should inspect your garage floor for any signs of damage such as cracks, stains, and uneven surfaces. The presence of these issues might require certain steps to be taken before applying a coating.
Why is thorough cleaning significant before coating application?
Thorough cleaning ensures that the coating adheres properly to the garage floor. Dirt, oil, and other substances can prevent the coating from sticking to the floor, leading to peeling and chipping.
What are the appropriate cleaning products for my garage floor?
Choosing the right cleaning product largely depends on the type of stains on your floor. However, generally, a good quality degreaser or a concrete cleaner can be used.
How should I clean my garage floor before applying a coating?
Sweep the floor to remove dust and debris, then apply a concrete cleaner or degreaser. Scrub the floor with a stiff-bristled brush and rinse it with water. Once it’s completely dry, the floor is ready for coating.
What steps should I take to repair cracks in my garage floor?
Cracks should be filled with a concrete repair or epoxy filler. Once the filler has dried, using sandpaper to smooth the surface is recommended.
How can I choose the best coating product for my garage floor?
It depends on the specific requirements of your garage floor. Epoxy and polyurea are generally considered to provide superior durability and resistance to chemicals.
How do I apply primer to my garage floor?
Using a paint roller, apply the primer in even strokes, covering the entire surface. Allow it to dry completely before applying the coating.
How can I ensure effective application of the garage floor coating?
After cleaning and priming, apply the first layer of coating using a roller or sprayer. Let it dry completely before applying the next layer.
How long should the floor coating dry and cure?
Drying times can vary based on the type of coating product and environmental conditions, but generally it can take between 24 to 72 hours. It’s important to let the floor cure completely before using it.
What safety measures should I consider while applying a garage floor coating?
Some measures include wearing protective clothing and gloves, ensuring good ventilation, and storing the coating product safely out of reach of children and pets.
How do I maintain my newly coated garage floor?
Regular cleaning and avoiding heavy impacts can help maintain the coating. If you notice any chips or cracks, repair them promptly to prevent further damage.
What common problems might I face after garage floor coating application?
Common issues include peeling, bubbling, or discoloration of the coating. These could be due to improper preparation of the floor, using the wrong coating product, or not allowing the coating to dry and cure properly.